How Lighting Affects Your Appearance: The Complete Science Guide
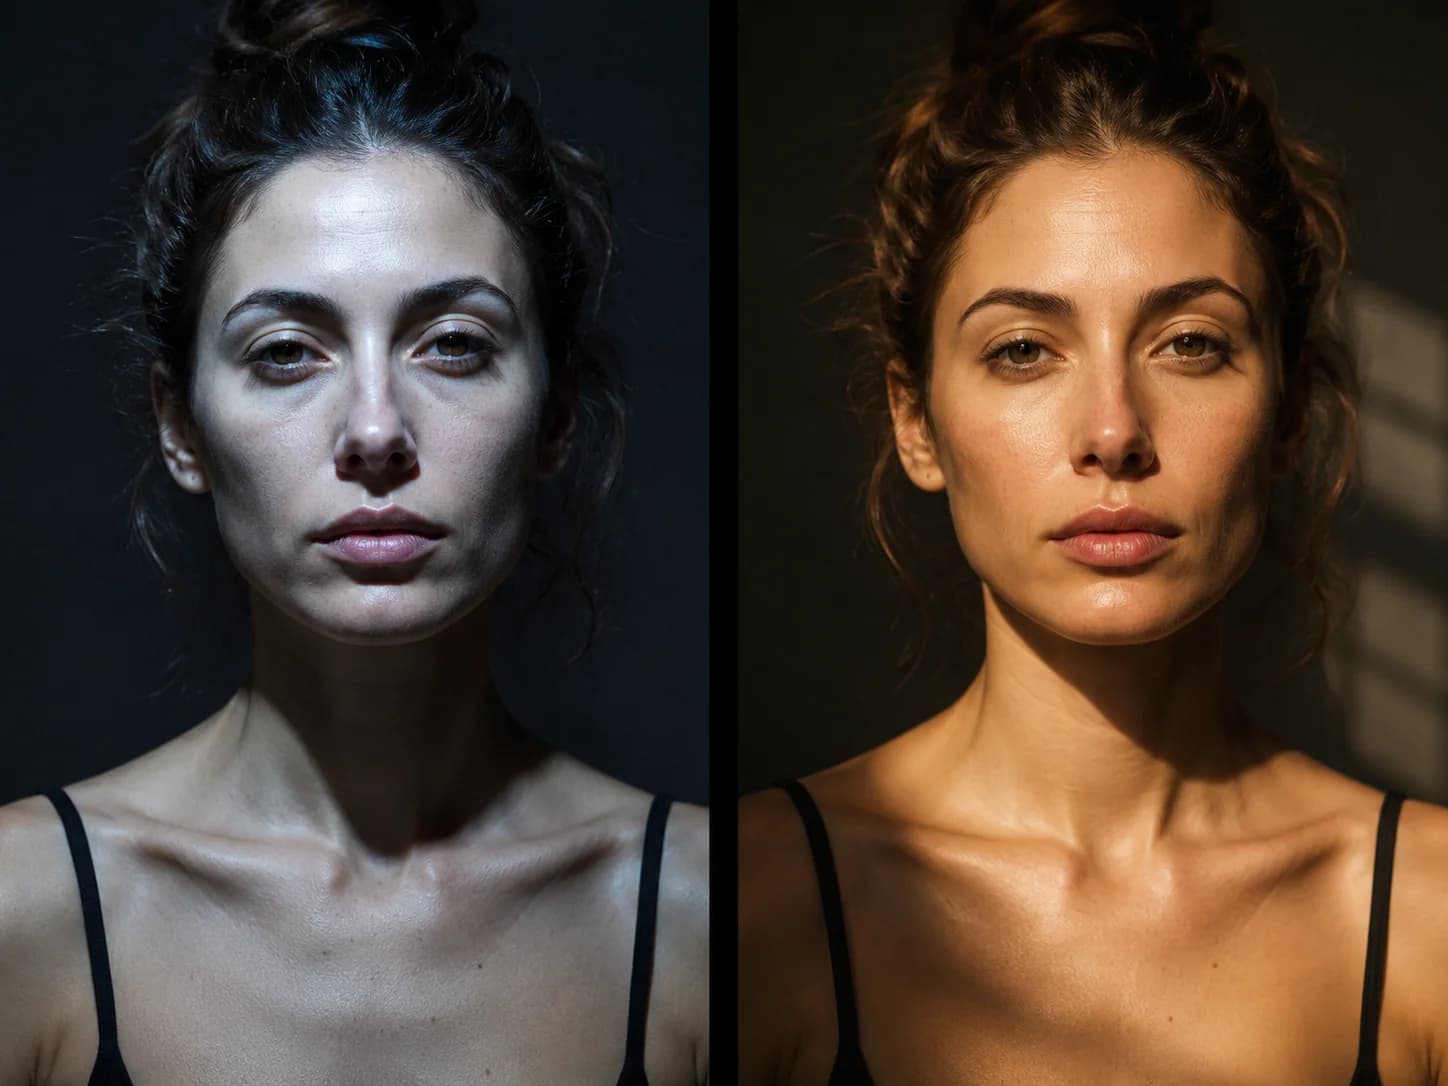
Two photos of the same person. Same outfit, same expression, same camera. One is taken under overhead office fluorescents, the other next to a window on a cloudy day. The difference in how good the person looks is not subtle — it is dramatic, and people who see both images rarely believe they are looking at the same face. Lighting is not a cosmetic enhancement. It is a fundamental input into the way your face is perceived, and understanding its mechanics is one of the highest-leverage things you can learn about your own appearance.
Colour Temperature: Why Some Light Makes You Look Sick
Light colour is measured in Kelvin (K). Lower Kelvin values produce warmer, redder light. Higher values produce cooler, bluer light. Candle flame sits around 1,800K. Overcast daylight sits around 6,500K. Most indoor environments mix multiple sources at different temperatures, and the mismatch can produce uncomfortable, unflattering results.
For skin appearance, light in the 4,000–5,500K range — often described as neutral to cool white — tends to produce the least flattering result. This range closely corresponds to standard office fluorescent and LED lighting. It renders the skin with a slightly grey, desaturated tone that removes the warm red and yellow undertones that signal health and vitality. Research by Stephen et al. (2009) established that warmer, more saturated skin tone is strongly associated with perceived health and attractiveness.
Warmer light (2,700–3,500K) restores these yellow and red skin undertones. Natural afternoon sunlight sits in this warm range, as does incandescent light and the warm-white LED setting used by most professional studio photographers and videographers. This is why candlelit restaurants and warm-lit home environments tend to be flattering — the physics of the light is doing something real to your skin's perceived health.
The warm-white setting on a smart bulb (around 2,700–3,000K) is typically the most flattering for faces in home photography and video calls.
Colour Rendering Index (CRI) and Skin Tone Accuracy
Colour Rendering Index (CRI) is a measure of how accurately a light source renders colours compared to a reference natural-daylight source, rated from 0 to 100. A CRI of 100 means colours look exactly as they would under ideal natural daylight. Old fluorescent tubes commonly had CRI values of 60–70 — meaning they rendered colours inaccurately, often washing out reds and yellows from skin tone.
Modern LED lighting can achieve CRI values of 90–98, rendering skin colours much more accurately. The practical consequence is significant: under low-CRI fluorescents, the red undertones in healthy skin are suppressed, making the face appear pale, grey, or unwell. Under high-CRI warm LEDs, those undertones are preserved and the skin looks closer to how it appears in natural light.
Professional photo and video studios use high-CRI (95+) lighting as a standard requirement. When you look dramatically better on a well-produced YouTube video than in your office Zoom call, CRI is often a significant part of the reason.
Direction Matters More Than Intensity
The direction from which light strikes the face determines which features are highlighted and which fall into shadow. Overhead light — the default in offices, stores, and most indoor spaces — casts downward shadows into the eye sockets, nasal creases, the philtrum, the hollow under the lower lip, and the sides of the face. These shadows emphasise exactly the features associated with tiredness and aging: dark under-eyes, deep nasolabial folds, and hollowed cheeks.
Front-facing light — a window in front of you, a ring light at eye level — fills in these shadows evenly, minimising their depth and restoring the even skin tone associated with youth and health. The face reads as flatter in a photographic sense (less shadow = less three-dimensional depth) but also as more attractive and less fatigued.
Research by Whitehead and Mossman (2018) tested facial attractiveness ratings under different lighting directions and found that frontal and slightly elevated frontal lighting consistently produced higher attractiveness ratings than overhead or side lighting. The photographic profession has known this empirically for a century — the science now explains why.
Face a window rather than sit with a window behind you. This is the single highest-impact lighting change most people can make at home.
Advertisement
Rembrandt Lighting and the Classic Portrait Formula
Rembrandt lighting is a technique used in portrait photography that places the main light source at approximately 45 degrees to the side and 45 degrees above the face. It creates a small, triangle-shaped highlight on the cheek opposite the light source, defined by shadow. This technique produces the three-dimensional depth that makes a face look sculpted and characterful rather than flat.
The Rembrandt triangle works because the human visual system is trained to read shadow and highlight patterns as indicators of facial structure. When the shadow-highlight relationship follows a pattern associated with a well-structured face, observers unconsciously perceive the face as more defined and attractive. Professional portraitists have used this technique since the seventeenth century for exactly this reason.
For everyday contexts, a simplified version involves having your main light source — a window, lamp, or ring light — positioned 30–45 degrees to one side and slightly above eye level. This adds depth and definition to the face without the harshness of direct side lighting.
“Light is not something you add to a portrait. It is the portrait.”
Why TV and Film Lighting Looks So Flattering
Professional television and film lighting uses a three-point system: a key light (main source), a fill light (softer, opposite side, reduces harsh shadows), and a backlight (separates the subject from the background). The key light is typically a large, diffused source — a softbox, an LED panel with a diffuser, or a bounced strobe — that creates soft, even illumination with gentle shadow transitions.
Large, diffused light sources produce soft-edged shadows. Small, direct sources (like a bare bulb or a flash pointed directly at the face) produce hard-edged shadows. Soft-edged shadows are far more flattering because they gradual transition between highlight and shadow, mimicking the gentle contours of a young, well-hydrated face. Hard-edged shadows emphasise every texture and wrinkle with blunt contrast.
This is why a professional ring light from 2–3 feet looks significantly better than a smartphone flash from 18 inches. The ring light is a large, diffused source. The flash is a tiny, harsh source. The physics of soft vs hard shadows does the rest.
Practical Lighting Rules for Photos and Video Calls
For video calls: position yourself facing a window during daylight, or use a desk lamp with a warm-white (2,700–3,000K), high-CRI bulb placed at eye level to your front. Avoid sitting with the window behind you — this creates a silhouette effect where your face is underexposed relative to the bright background.
For photos: natural overcast daylight from in front of you is the closest you can get to professional studio conditions without equipment. Direct sunlight creates harsh shadows and causes squinting — move into open shade instead. Indoors, a large window with the subject facing it produces the soft, even illumination closest to a studio fill light.
For self-analysis — including AI face tools — consistent, even front-facing light produces the most accurate landmark detection and the most stable results across multiple sessions. Dramatic side lighting, overhead fluorescents, and coloured ambient light all introduce variables that can affect how the AI reads your facial proportions and expression.
Frequently Asked Questions
What is the most flattering lighting for your face?
Soft, diffused front-facing light at eye level or slightly above is consistently the most flattering. Natural overcast daylight from a window you are facing is the closest everyday equivalent to professional studio lighting. For artificial light, a warm-white (2,700–3,000K), high-CRI (90+) LED source placed at eye level in front of you produces excellent results.
Why do I look so bad under fluorescent lights?
Standard fluorescent and older LED office lights typically have a colour temperature of 4,000–5,500K (cool white) and a low Colour Rendering Index (CRI) of 60–80. These properties suppress the warm red and yellow undertones in healthy skin, making the face appear grey and unwell. They also come from overhead, casting downward shadows into the eye sockets and nasolabial folds.
What is colour temperature and why does it matter for skin?
Colour temperature (measured in Kelvin) describes the warmth or coolness of a light source. Lower Kelvin (2,700–3,500K) produces warm, yellowish light that enhances the warm undertones in skin. Higher Kelvin (5,000–6,500K) produces cool, bluish-white light that removes these undertones. Research shows that warm skin undertones are strongly associated with perceived health — making light temperature a direct input into how healthy and attractive you look.
Why do I look so much better in natural light?
Natural daylight (especially overcast sky) combines a high CRI (near 100, accurately rendering all colours), a moderate colour temperature that preserves skin undertones, and a large diffused source that creates soft shadows. It is essentially the reference condition against which all artificial lighting is measured — and most artificial sources compromise on at least one of these properties.
Does lighting affect AI face analysis results?
Yes, significantly. AI facial analysis tools rely on detecting landmarks and analysing proportion and colour. Harsh directional lighting, low-CRI light that distorts skin tone, and coloured ambient light all affect how accurately the AI reads facial features. Even front-facing natural light produces the most consistent and accurate results for facial analysis.
Lena Whitmore
Science Writer · Facial Analysis & Appearance Psychology
Lena covers the science of smiles, facial aging, and AI-powered biometrics. She writes evidence-based guides grounded in peer-reviewed research, with a focus on making appearance science accessible and actionable. All tools on Smile Tracker run locally in your browser — your photo is never uploaded anywhere.
Put it to the test
See your results with AI
Upload a photo and get your AI facial proportion analysis, symmetry measurement, and feature breakdown — free, private, instant.
Analyse My Face Free →Advertisement
Sources
Related reading
Why Do I Look Bad on Camera? The Real Reasons (and How to Fix Them)
May 2026 · 7 min read
Why Does My Nose Look Big in Selfies? The Camera Science Explained
May 30, 2026 · 6 min read
Why Does My Face Look Fat in Pictures?
May 30, 2026 · 7 min read
Why Do I Always Look Tired? The Anatomy Behind a Permanently Fatigued Face
May 30, 2026 · 7 min read
Filter Dysmorphia: When Beauty Filters Distort How You See Yourself
May 29, 2026 · 8 min read
Why Do I Look Different in Every Photo? The Real Explanation
May 29, 2026 · 6 min read